DesktopPic
Version 2.0.3
Display or stamp images on your Windows desktop wallpaper with full support for multiple monitors.
DesktopPic 2.x requires Windows 10 or 11.
DesktopPic 1.x can be used with Windows 7 and 8. Click here for the 1.x documentation.
How to Download and Install
Note: Some antivirus software may falsely detect the download as a virus. This can happen any time you download a new executable and may require extra steps to whitelist the file.
Install Using Setup Program
The DesktopPic installer requires administrator access.
- Download the installer using the link above.
- Double-click DesktopPic-Setup.exe to start the installation.
- In the SmartScreen window, click More info and then Run anyway.
Note: The installer is only provided in English, but the program works with any language.
Portable Use
Using DesktopPic as a portable app does NOT require administrator access.
- Download the zip file using the link above.
- Extract the contents. You should see DesktopPic.exe and AppParts and Examples folders.
- Move the contents to a permanent location of your choice. For example C:\Tools\DesktopPic.
- Double-click DesktopPic.exe to start the slideshow.
- In the SmartScreen window, click More info and then Run anyway.
Summary
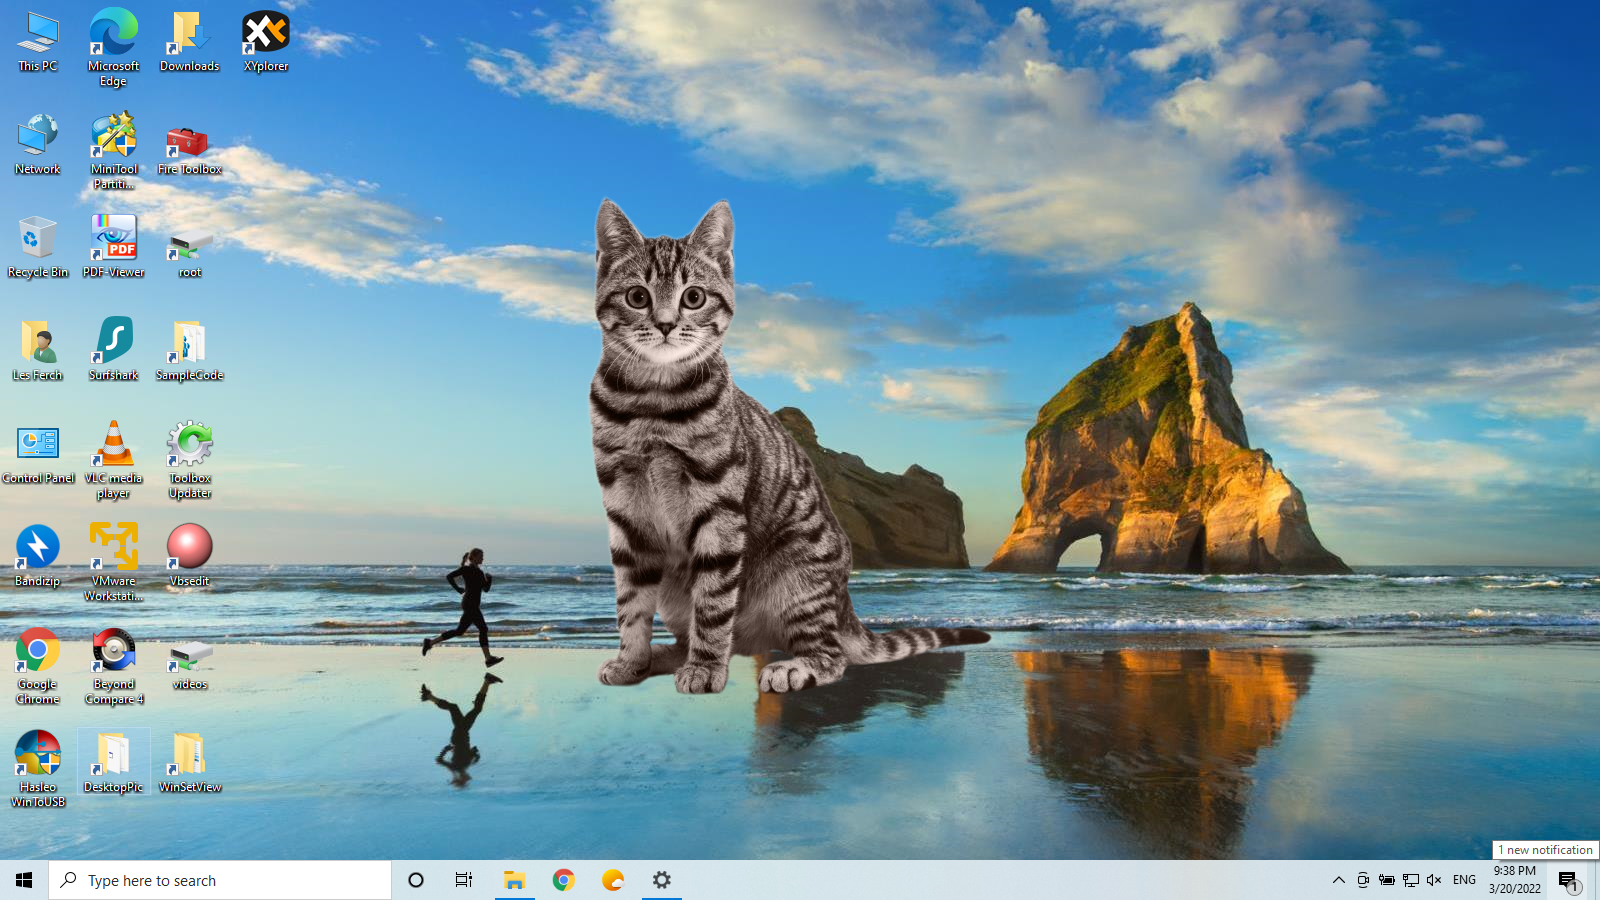
DesktopPic provides two convenient methods to display one or more pictures on your Windows desktop. You can create a slideshow that overlays an area of your desktop or stamp images directly to your wallpaper.
Note:
- DesktopPic always maintains the original picture’s raw pixel aspect ratio. It does not read rotation metadata. If an image displays with incorrect rotation, simply load it into an image editor and resave it. See the Resources section below for recommended programs.
Method 1: Slideshow
Displays one or more pictures in a window that has no borders or captions, so all you see is the picture. The image window may be positioned manually or set to appear in the center or any corner of any monitor. This will give the illusion of the picture being part of your wallpaper, but it’s really just another window. Any desktop icons in the same region as the picture will be covered. Bitmap image formats, such as PNG (recommended), JPG, BMP, WebP (photos), and animated GIFs are supported.
Notes:
- You can run multiple copies of DesktopPic (use portable option) to have more than one slideshow on your desktop (on any monitor).
- DesktopPic does not do a wallpaper slideshow (that capability is built into Windows under “Personalize”).
Method 2: Stamp Image to Wallpaper
One or more images can be stamped to the wallpaper in any size or position. This makes the picture part of the wallpaper, so it will never be on top of anything else and will require nothing to be left running. Images can be stamped on any monitor. Images with a transparent background are supported.
Note:
- The Stamp feature provides the same result as if you edited your wallpaper using an image editing program. It just makes the process easier and more fun (and easier to undo).
How to Use (Slideshow)
Step 1: Start the program
Double-click DesktopPic.exe to start the program.
Step 2: Show the interface
Double-click anywhere on the displayed image to show the DesktopPic interface. The Esc key may also be used if the slideshow program has focus.
Step 3: Select an image folder
Click the Folder icon to select a folder of images to be displayed. By default, one of the example folders will be selected. Even though you are only selecting a folder, a file dialog is presented so that you can see what files are in each folder. Double-click any file in the desired folder to pick that folder.
Step 4: Click the Settings icon
This will display all of the slideshow options.
Step 5: Select interface language
If Windows is set to a language that DesktopPic supports, that language should get selected automatically. The desired language can also be selected from the language menu. The language menu is dynamically generated from the AppParts\Language folder. New languages may be added by following the existing examples.
Step 6: Adjust slideshow options
Change the Pic delay in seconds to the number of seconds to wait before loading the next image.
Change Max percent of screen area to the desired value. This number represents the maximum percent of your screen area that will be used by the DesktopPic window. Note that the image will not be stretched larger than its native resolution unless Stretch smaller images is checked. Also note that the aspect ratio of each image will be maintained and the image will never overlap onto another monitor (unless manually positioned). Therefore, you may not see as much of the screen covered as expected, based on the percent value entered, unless the image is the same aspect ratio as the available display area (i.e. screen size minus taskbar).
From the Display menu, select the desired monitor where you want the slideshow displayed.
From the Window position menu, select the desired position for the slideshow. If you select Custom, drag the window to the monitor and location where you want the slideshow to appear.
Adjust the Padding value if you are using one of the corner positions, such as Lower Right, and don’t want the image tight to the screen edge.
From the Viewer menu, keep the viewer set to EXE if you are displaying images with a transparent background or want to use the crossfade feature. The HTA viewer will display transparent images on a solid background (the same as the interface), does not support crossfade, and can’t display some image formats such as WebP and HEIC. However, the HTA viewer uses far less memory, so it’s a great choice for displaying PNG or JPG photos.
Adjust Crossfade in seconds (available when Viewer is set to EXE) to the amount of time you want one image to fade into the other. Set the value to 0 for no fade effect. This option has no effect on animated GIFs.
Note: For the fade effect to be smooth, the images must all be the same size. If they are different sizes, there will be a jerk as the image window is changed from one size to the other. To fix that issue, make all the images in one slideshow the same size. For images with different aspect ratios, or images with a transparent background, you may want to change the “canvas” size to be the same for all images. See the Resources section below for recommended programs.
Step 7: Adjust additional options
Check Run on startup if you want DesktopPic to run when you login. If you are setting up multiple slideshows (using multiple portable copies of the DesktopPic folder) you will need to open shell:startup in Explorer and rename the DesktopPic shortcut to a unique name for each Run on startup instance.
Check Bring to front on start if you want DesktoPic to come to the front of all other windows when it’s launched. This setting does not keep DesktopPic in front. It just affects how it starts.
Check Stretch smaller images if you want images to be stretched (with aspect ratio maintained) to the size of the DesktopPic window. Leave this item unchecked if you always want images to be displayed at their native resolution (or smaller) in order to maintain the best quality.
Check Display file names if you want the image file name displayed.
Leave Average background color checked in most cases. This option only applies to the background seen behind transparent images when the DesktopPic interface is open or when using the HTA viewer. When checked, the color is an average of the current screen’s wallpaper color. When unchecked, the color is picked from one pixel from the upper left corner of the wallpaper.
Check Keep interface centered on primary screen if you want the DesktopPic interface to always be in the center of the primary screen regardless of the slideshow position. This option is automatically unchecked when the Custom position option is selected.
Step 7: Continue the slideshow
Press the Play button or press Enter to hide the interface and continue the slideshow. All setting changes are automatically saved to a DesktopPic.ini file.
Slideshow controls
If only one image file is in the selected folder, that image will be displayed as long as DesktopPic is running. If more than one image is in the folder, DesktopPic will cycle through the images, showing each one for the number of seconds that has been set (5 seconds is the default).
The slideshow can be paused by pressing any one of left arrow, right arrow, spacebar, or backspace.
You can manually cycle forward through the images by pressing right arrow or spacebar and backward by pressing left arrow or backspace.
Pressing Enter resumes the slideshow.
Other interface features
A single click on the image (when the Settings are NOT displayed) will:
- Adjust the current window size (if necessary) to match the image’s aspect ratio.
- reset the app’s background color from the current display’s wallpaper image.
- save all settings to the
DesktopPic.inifile.
A double click on the image (when the Settings are displayed) will:
- reset the window size (based on the current settings).
- reset the app’s background color from the current display’s wallpaper image.
- save all settings to the
DesktopPic.inifile.
All settings are automatically saved when you click the Play button or exit the program.
The Help button opens this document. Click it whenever you want to see if a newer version is available. DesktopPic does not automaically check for new versions or collect any data. It is truly a free program.
While the interface is displayed, F3 will open File Explorer to the current DesktopPic folder (location of slideshow images) and F4 will open File Explorer to the DesktopPic wallpaper backup folder (location of stamped wallpaper images).
AppData Location
The AppData folder for the DesktopPic.ini file will be within the DesktopPic folder when run from a writable location (e.g. C:\Tools\DesktopPic\AppData), but will be in the user’s Local AppData folder (%LocalAppData%\DesktopPic) when run from a protected location such as C:\Program Files (x86). This is the primary difference between the “portable” and “installer” options described at the beginning of this document.
Supported and recommended image file formats
For photos, JPG/JPEG and PNG images are recommended and work with either the EXE or HTA viewer.
BMP and TIF/TIFF formats also work with both viewers.
The EXE viewer also displays WebP and HEIC/HEIF photos, but note that these formats will show as a blank page while the interface is open.
Transparent background PNG and GIF images can be displayed by both viewers, but only the EXE viewer supports transparency to the desktop wallpaper. The HTA viewer will show a solid color background with transparent images, which will give the illusion of full transparency when the display’s background is set to a solid color (and there are no icons in the area covered by the slideshow image).
Animated GIFs are also supported, but note that the crossfade feature does not apply to animated GIFs.
For WebP files, only regular photo type images are supported (and only with the EXE viewer). WebP images that have a transparent background should be converted to PNG format. Animated WebP files should be converted to GIF format.
Please note that the amount of memory used by the viewer is mostly a function of the size of the images. Large image files (e.g. 4K image files) will take much more memory to display than smaller images, even if they are displayed at the same size. Therfore, it’s recommended to use an image editing program to reduce the size of your slideshow images to the maximum size you wish to have them displayed. See the Resources section below for recommended programs.
Also note that using the HTA viewer will use less memory than the EXE viewer and may not display large images (e.g. 4K images) correctly, which is another reason to reduce the size of your slideshow images.
How to Use (Stamp Image)
Step 1: Start the program
If not already running, double-click DesktopPic.exe to start the program.
Step 2: Show the Interface
If the interface isn’t currently displayed, double-click the image or press Esc.
Note: The Stamp button is not available when the program settings are displayed.
Step 3: Select the Desired Picture to Stamp
Use your keyboard left and right arrows (or spacebar and backspace) to select a picture to stamp.
Note: HEIC/HEIF and WEBP images are not supported for the stamp feature. PNG images are recommended, but other bitmap formats, such as JPG, may also be used.
Step 4: Move and Resize
- Drag the DesktopPic window to where you want to stamp the image.
- Resize the DesktopPic window to the image size you wish to stamp.
- Click once on the image to snap the DesktopPic window size to the image’s aspect ratio.
Step 5: Stamp the Image
Click the Stamp button to stamp the image to the current desktop wallpaper.
Hold down any modifer key (Alt, Ctrl, or Shift) when clicking the Stamp button to shift the stamped image up the amount of the DesktopPic title bar. This allows stamped images to be placed at the top edge of any display.
Repeat steps 2-4 to stamp more images.
Notes:
- Click the Restore button to restore the unstamped wallpaper.
- If you click Restore by accident, just right-click your desktop wallpaper, select Personalize, and reselect your stamped wallpaper.
Step 6: Exit DesktopPic
Click X to close DesktopPic.
Resources
Edit images (size, canvas size, orientation)
Note: Paint.Net is a full featured image editor with excellent resizing options, but requires changing one image at time. XnConvert can change the image size or canvas size for multiple images.
Note: MSPaint works fine for changing an image’s size or orientation. However, it does not have a canvas resize option and may loose transparency (depending on version).
Convert WebP to GIF
Transparent background images